Showing posts with label FREE patterns - sewing and crochet. Show all posts

Saturday, February 1, 2014

Crochet bracelet pattern, and stuff....

Me and my friend Linda are all geared to set up our little craft market at our church in April, so I've been a busy bee making as much as I can. I decided I needed some affordable little crafty things to sell and I came up with this bracelet.
If you can crochet, I'll give you the basic instructions here:


1, Using a ball of twine and a length of embroidery cotton, leave a tail (for tieing) then chain a length a bit shorter than your wrist.
2. Pull through the last loop and knot it (as pictured), then single crochet all the way back down the chain, leaving another tail, so both tails are at the same end. 
3.   Using embroidery cotton single crochet down one side leaving a length at the end longer than the tail.
4/  Do the same on the other side.
5.  Then plait the tail and two embroidery cottons together. 
6. Do the same for the other tail. Knot the ends. Knot the two tails together if you wish.


******************************************


Also using this free pattern to make some little aliens/monsters. (Faces will come last :)

*********************************************

And me and Catherine were at the Auckland Folk Festival a week or so again. I paid $15 to get another hair wrap, except this time I was sneaky and watched her do it. So I did one on Catherine and it turned out pretty cool. I wont show you how to do it though, coz that would be stink!




Tuesday, November 12, 2013

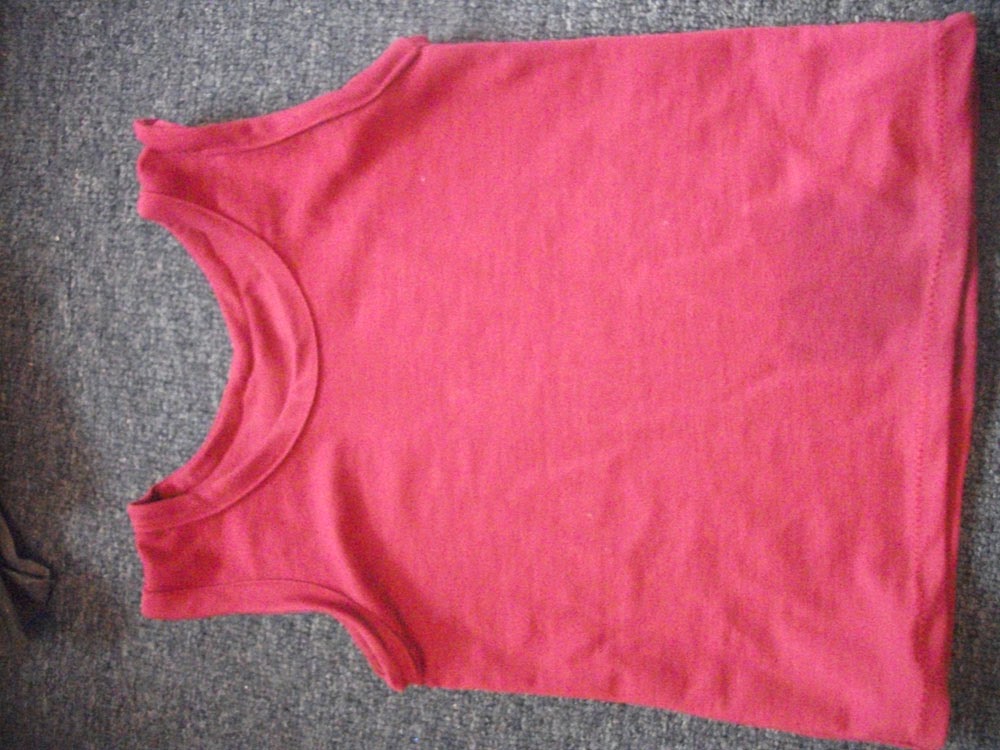
child's Singlet (Vest) Free Pattern


This is a singlet I made for my eight year old daughter. I think this pattern would do for anyone between age 7 - 10.

I made7 of these this winter and I actually made her wear 3 of them at time! Overkill? Well, this is the first winter she didn't get a bad cough so I think it did the trick. I managed to make these out of merino blend which made them extra snuggly.

The free pattern can be found here.

The pattern DOES NOT include the ribbing. For the ribbing (edging around the neck and sleeves) just cut some lengths of fabric 3 cm wide for this.

Making this singlet is pretty straight forward, but I will put a few instructions up just incase.


Cut out the back and front pieces from the pattern.

Sew along where I have marked with the pink dotted lines.


If you havn't overlocked the edges of your fabric you can do a French Seam.

Since it's knit fabric don't worry about ironing it.
 Basically what you do is sew the edges together, turn it inside out and sew down the side again, catching the raw edges inside the seam. 
It's quite bulky this way, so you might just want to overlock / zig zag or just leave the edges raw.


The neck and sleeve edging is NOT in the pattern. Just cut a length of fabric 3 cm wide for this and cut off what you need as you go.


There are better ways to put ribbing on than the way I did it.
(I have given a link below for a good tutorial)

The way I did it was to place the right side of the fabric to the inside of the singlet then sew it to the neck opening,


Then I flipped it over and tucked in the bottom and sewed it down around the neck edge.
Sorry, not too detailed , but there are already great tutorials on ribbing.
There's a great one here, with a cool free baby onsie pattern from Shwin&Shwin


Thursday, October 6, 2011

How to make a 6 panelled skirt, size 6 child.


 My daughter is taking drama classes at the moment, so here is a very theatrical skirt, it's pattern and it's tutorial.

The pattern is in pdf, and can be found here. Print out the 6 A4 sheets, cut out the rectangles and tape together, then cut out the pattern pieces.

Step ONE: Cut out the pieces. There should be 6 skirt panels, 6 pieces for the frill, and two waiste banc pieces.


Step TWO: Place the frill pieces together and sew into one long strip, then sew remaining edges together to form a circle. The pieces are sewn short sides together as shown.


Step THREE: Sew the panel pieces together by placing right sides together (that means the side that's going to show outside), and with the short ends all at the top, so the skirt flares out at the bottom. Here are four pieces sewn together. All six need to be sewn together, then the first piece and the last piece sewn together to make the skirt.

 Step FOUR: Turn the pieces over (you should have two pieces now.... the skirt piece, and the frill piece) and iron the seams flat.

 Step FIVE:  Pin the frill to the skirt. Do this by pinning right sides together... pin so the panels match, then gather the rest into a frill.


Step SIX: To attach the waiste band, sew the two pieces together to form one long band. Then pin to inside of the skirt, wrong sides together.


Step SEVEN:  Fold over waisteband to the front, tuck under a 10mm seam and sew down, leaving a gap in the front to thread through some elastic. To thread elastic through, attach it to a safety pin and push it through the waiste band. Tie the elastic in a knot, then sew down the gap if you wish.

Thursday, August 12, 2010

Dolly Patterns


oh silly me. This has been on the Dolly Donations blog for two days and I didn't think to link to it.


My dolly patterns have been featured!

Monday, July 26, 2010

Boy Dolly Jumpsuit pattern


Here is the pattern for the jumpsuit for the free dolly pattern for Dolly Donations, a website that gets people to make doillies for children in need.
This is my pattern and free for anyone to use. The dress pattern is here.
The pattern prints out as an A4


DOLLY DRESS TUTORIAL


As promised, here is the dolly dress tutorial. This may also end up on the Dolly Donations website in PDF to download, I will post the link if it does :)
Click on these to enlarge them. For printing, they are exactly A4.

Sunday, October 18, 2009

FREE BOOTLEG PANTS PATTERN - 4-5 year old.


Here is a free pattern for a pair of pants for around a 4-5 year old. These were made for my 4 year old, but she's big for her age. I'm learning as I go, so this is a very basic pattern, with no notches, and only one size. The squares are also skewif! but they stick together ok. (The pattern is in squares, you cut them out and sellotape them together).

The pattern is on the Scribd website here

Sunday, October 11, 2009

Hippo How-to PART TWO

Here is how to make my hippo. (/ bear/could also be a dinosaur)... someone (:P) has said he looks like George off Rainbow.. so hence I have named this one 'George'. Pattern is here. Part one is here

PART TWO.
5. After sewing both sides to middle strip, sew the two side pieces part way together, turn inside out and stuff. Then sew completely together.

6. Voila! (Walla?) I seemed to have sewed him up unevenly, but decided this added to his charm!


7. Sew on arms and legs. When embroidering the face, I like to stick in a few pins to get an idea of what will look best. I also like my hippo to sit up by itself, so I stick a few pins into the legs to make sure he will sit before I sew them on.
This is a very rough guide, and assumes you know how to hand stitch.


Hippo How-to PART ONE

Here's how to make my little hippo. Here is the pattern.

1. Place pattern pieces on scrap material
2. Pieces all cut up

3. Sew darts on the face and bottom... make sure they are done for either side of the body, left and right.

4. Place middle section at point of head, and start to stitch together along the side of the "side" piece.


Side piece all stitched on
PART TWO coming


Friday, October 9, 2009

FREE PATTERN, for a 2 year olds dress

This is a picture of the finished dress. I made a proper pattern for it and everything... a pdf in pieces you can print out and tape together. The pattern can be found here.
PLEASE NOTE: I have made this (pictured) but I have not tested it on an actual 2 year old!!.
If you would like to test this out for me I would love to see pictures. You can message me through my etsy site here :)

FREE Hippo or Bear pattern


I can't decide if this is a bear or a hippo. I have placed the eyes to look like a bear... but if I'd moved the eyes to the sides it definitely would have been a hippo.

Anyway... here's the pattern.